First, you will need the following supplies:
1.5" Ribbon
3/8" Ribbon
A piece of thin elastic or a piece of floss
Lighter
Scissors
Glue gun
Hair clip
A cutting mat or a work surface where it's ok if a little glue gets on it.
Measure the ribbons and cut them into the following lengths:
- The 1.5" ribbon: 6.5"
- The 3/8" ribbon: 4.5"
- A second piece of 3/8" ribbon: 3"
Take your lighter and run it past the edges of each ribbon. Keep it steady and keep it moving so it doesn't burn the ribbon. This will seal the ends of the ribbon so they don't fray. I apologize, I wasn't able to get a good picture of me doing this step. It was too hard to hold the camera and the lighter at the same time.
Now take the 1.5" ribbon and make it into a loop by putting two small dots of hot glue on each corner of one end of the ribbon and then press the other end of the ribbon to it to form the loop.
I like to use my cutting mat for the next step to make sure that each side of the bow is the same size. If you don't have a cutting mat, you could use a ruler to measure. I place the seam (where the loop if glued) on one of the vertical lines on my cutting mat. I then flatten the top of the loop down and adjust each side by sliding the ribbon so that there is an equal amount of loop on either side of the vertical line. Once I feel like both sides are the same length, I add a small drop of glue in between where the top and botton of the loop meet. It makes things stay in place when tying the bow.
Next, take the loop and pinch it in the center where you just added the drop of glue. Make sure the edges are flipped in the direction that will be the underside of the bow.
Now this takes a bit of practice, but with the other hand, loop the elastic around the pinched part, pull it tight and make a tight knot in the back. If you need two hands to do this, try using the hair clip to pinch the center while you tie the knot. Once the knot is tied, clip the ends of the elastic.
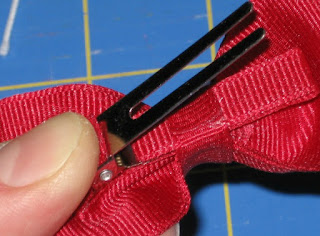
Now you need to line your hair clip. I like to use the double pronged metal clips because they have a stronger hold than the single prong clips. You can buy the clips online or if you have a hair supply store near you, they usually carry them as well.
Lay the longer piece of 3/8" ribbon horizontally and add two lines of glue (or one if you're using a single pronged clip) approximately 1.25" across the the end of the ribbon and then press it up to the underside of the top portion of your clip.
Put a thin strip of hot glue on the top of the clip and carefully flip the ribbon and lay it down on top of the clip. Smooth it gently with your finger and then wipe any excess glue off that may have squeezed out of the sides. If the excess glue is too hard to remove, you can carefully warm it with the lighter and then wipe it off. Just be careful, it will be hot and can burn your finger a little. Once that is done, flip the clip over and line the remaining part. I leave the bottom prong unlined, but if you use a longer piece of ribbon, you can fully line your clip.
Now that the clip is lined, back to the bow. Put a dab of glue on the top center of your lined clip and press your bow onto the clip. Hold it there for about 10 seconds while the glue sets.
Add a dab of hot glue to the elastic in the center of the bow. Then take the short piece of 3/8" ribbon and press it on the the elastic. This will cover up the elastic and finish the center of your bow.
The ends of the ribbon only need to be long enough to wrap around the bow and overlap slightly on the underside of the clip, so you will probably need to snip off a bit on each end and then re-seal them with the lighter. I often leave them longer and then cut them at this point so I can make sure they"re going to be long enough and I can make them just the right length for each particular bow.
Wrap one end of the center ribbon under the top portion of the clip. Add a little glue and press. Now do it to the other side of the ribbon, overlapping the first one.
And that's it, you have an adorable little bow! Again, if you would rather attach it to a headband, just skip the clip and wrap the center ribbon around a headband in the same way.
Enjoy!
~Erica


No comments:
Post a Comment